Deep Dive Into Delta Lake

Delta Lake is an open source storage layer that brings reliability to data lakes. Delta Lake provides ACID transactions, scalable metadata handling, and unifies streaming and batch data processing. Delta Lake runs on top of your existing data lake and is fully compatible with Apache Spark APIs. Delta Lake uses versioned Parquet files to store your data in your cloud storage. Apart from the versions, Delta Lake also stores a transaction log to keep track of all the commits made to the table or blob store directory to provide ACID transactions. Delta Lake doesn’t care about number of partitions, only the number of files
- allows time travel within a month → rollback to previous version to correct errors
- supports ACID → allow concurrent batch and streaming operations to write data with ACID guaranteed
- tracks audit history
- deletes and upserts into table
- supports many concurrent batch & streaming jobs writing at the same time
- enable schema enforcement and schema evolution
Create Delta Tables
Create Table as Select (CTAS)
CTAS statements automatically infer schema information from query results and do not support manual schema declaration.
This means that CTAS statements are useful for external data ingestion from sources with well-defined schema, such as Parquet files and tables.
CREATE OR REPLACE TABLE sales AS
SELECT * FROM parquet.`path/to/parquet/files`;
Below, we show evolving a CTAS statement to include a number of additional configurations and metadata.
CREATE OR REPLACE TABLE users_pii
COMMENT "Contains PII"
LOCATION "/tmp/users_pii"
PARTITIONED BY (first_touch_date)
AS
  SELECT *,
    cast(cast(user_first_touch_timestamp/1e6 AS TIMESTAMP) AS DATE) first_touch_date,
    current_timestamp() updated,
    input_file_name() source_file
  FROM parquet.`dbfs:/ecommerce/raw/users-historical/`;
Our SELECT clause leverages two built-in Spark SQL commands useful for file ingestion:
- current_timestamp() records the timestamp when the logic is executed
- input_file_name() records the source data file for each record in the table
We also include logic to create a new date column derived from timestamp data in the source.
The CREATE TABLE clause contains several options:
- A COMMENT is added to allow for easier discovery of table contents
- A LOCATION is specified, which will result in an external (rather than managed) table
- The table is PARTITIONED BY a date column (using disk partitioning); this means that the data from each data will exist within its own directory in the target storage location
NOTE: Partitioning is shown here primarily to demonstrate syntax and impact. Most Delta Lake tables (especially small-to-medium sized data) will not benefit from partitioning. Because partitioning physically separates data files, this approach can result in a small files problem and prevent file compaction and efficient data skipping. The benefits observed in Hive or HDFS do not translate to Delta Lake. It's not recommended to partition table <1GB, and it's best to have at least 1GB of data in each partition on disk.
As a best practice, you should default to non-partitioned tables for most use cases when working with Delta Lake.
Create Tables with Options
If your source data is csv files, you may run into a few issues as CTAS statements also do not support specifying additional file options. To correctly ingest data from files such as csv to a Delta Lake table, we'll need to use a reference to the files that allows us to specify options.
We can either create External Table or a Temp View , and then use this table or temp view as the source for a CTAS statement to successfully register the Delta table.
CREATE OR REPLACE TEMP VIEW sales_tmp_vw
  (order_id LONG, email STRING, transactions_timestamp LONG, total_item_quantity INTEGER, purchase_revenue_in_usd DOUBLE, unique_items INTEGER, items STRING)
USING CSV
OPTIONS (
  path = "path/to/csv_file",
  header = "true",
  delimiter = "|"
);

CREATE TABLE sales_delta AS
  SELECT * FROM sales_tmp_vw;
Save As Table from DataFrame
Create managed delta table from dataframe with table properties
(
df.write
  .option("delta.columnMapping.mode", "name")
  .option("delta.minReaderVersion", "2")
  .option("delta.minWriterVersion", "5")
  .mode("overwrite")
  .saveAsTable("table_name")
)
Create Table with Generated Column and declared Schema
Generated columns are a special type of column whose values are automatically generated based on a user-specified function over other columns in the Delta table (introduced in DBR 8.3).
The code below demonstrates creating a new table while:
- Specifying column names and types
- Adding a generated column to calculate the date
- Providing a descriptive column comment for the generated column
CREATE OR REPLACE TABLE purchase_dates (
  id STRING,
  transaction_timestamp STRING,
  price STRING,
  date DATE GENERATED ALWAYS AS (
    cast(cast(transaction_timestamp/1e6 AS TIMESTAMP) AS DATE))
   COMMENT "generated based on `transactions_timestamp` column"
	)
Because date is a generated column, if we write to purchase_dates without providing values for the date column, Delta Lake automatically computes them.
If a field that would otherwise be generated is included in an insert to a table, this insert will fail with DeltaInvariantViolationException if the value provided does not exactly match the value that would be derived by the logic used to define the generated column.
Clone Delta Table
Delta Lake has two options for efficiently copying Delta Lake tables.
Deep Clone
DEEP CLONE fully copies data and metadata from a source table to a target. This copy occurs incrementally, so executing this command again can sync changes from the source to the target location.
CREATE OR REPLACE TABLE purchases_clone
DEEP CLONE purchases
Because all the data files must be copied over, this can take quite a while for large datasets. Deep clone is used to create a backup of your dataset.
Shallow Clone
If you wish to create a copy of a table quickly to test out applying changes without the risk of modifying the current table, SHALLOW CLONE can be a good option. Shallow clones just copy the Delta transaction logs, meaning that the data doesn't move.
CREATE OR REPLACE TABLE purchases_shallow_clone
SHALLOW CLONE purchases
In either case, data modifications applied to the cloned version of the table will be tracked and stored separately from the source. Cloning is a great way to set up tables for testing SQL code while still in development.
The transfer of comments and table properties does not depend on the type of clone. In either type of clones (deep and shallow), the table properties are passed to the clone as well whereas the comments are something native to a table. Thus, the comments added to a table are not passed on to the clones.
Any changes made to a shallow cloned table will write new data files to the specified target directory, meaning that you can safely test writes, updates, and deletes without risking corruption of your original table. The Delta logs will automatically reference the correct files (from the source table and this clone directory) to materialize the current view of your dev table.
Incremental Cloning
If you examine the files in your backup table, you'll see that you have the same number of files as your source table. Upon closer examination, you'll note that file names and sizes have also been preserved by the clone.
This allows Delta Lake to incrementally apply changes to the backup table. When we re-execute our deep clone command, we only copy those files that were written during our most recent transaction.
File Retention in cloned Tables
Vacuum against the source table that remove files of a specified version will cause data loss in a shallow clone tables. However, because deep clone created a full copy of our files and associated metadata, we still have access to our deep clone table.
One of the useful features of deep cloning is the ability to set different table properties for file and log retention. This allows production tables to have optimized performance while maintaining files for auditing and regulatory compliance.
ACID in Delta Table
CRUD (Create, Read, Update, Delete) Operations
CREATE TABLE students
  (id INT, name STRING, value DOUBLE);
We can use INSERT INTO to atomically append new rows to an existing Delta table. This allows for incremental updates to existing tables, which is much more efficient than overwriting each time. INSERT INTO can cause duplicated records
INSERT INTO students VALUES (1, "Yve", 1.0);
INSERT INTO students VALUES (2, "Omar", 2.5);
INSERT INTO students VALUES (3, "Elia", 3.3);

INSERT INTO students
VALUES
  (4, "Ted", 4.7),
  (5, "Tiffany", 5.5),
  (6, "Vini", 6.3);
UPDATE students
SET value = value + 1
WHERE name LIKE "T%";
DELETE FROM students
WHERE value > 6;Merge in Delta Lake
You can upsert data from a source table, view, or DataFrame into a target Delta table using the MERGE SQL operation. Delta Lake supports inserts, updates and deletes in MERGE, and supports extended syntax beyond the SQL standards to facilitate advanced use cases.
You can use MERGE INTO for below table modifications:
- Write a stream of schema changes into a table
- Write data to a table with automatic deduplication
- Write streaming aggregates in Update Mode
MERGE INTO target a
USING source b
ON {merge_condition}
WHEN MATCHED THEN {matched_action}
WHEN NOT MATCHED THEN {not_matched_action}
An example for this pattern:
CREATE OR REPLACE TEMP VIEW updates(id, name, value, type) AS VALUES
  (2, "Omar", 15.2, "update"),
  (3, "", null, "delete"),
  (7, "Blue", 7.7, "insert"),
  (11, "Diya", 8.8, "update");

MERGE INTO students b
USING updates u
ON b.id=u.id
WHEN MATCHED AND u.type = "update"
  THEN UPDATE SET *
WHEN MATCHED AND u.type = "delete"
  THEN DELETE
WHEN NOT MATCHED AND u.type = "insert"
  THEN INSERT *;
Insert-Only Merge
A common ETL use case is to collect logs or other every-appending datasets into a Delta table through a series of append operations.
Many source systems can generate duplicate records. With merge, you can avoid inserting the duplicate records by performing an insert-only merge.
This optimized command uses the same MERGE syntax but only provided a WHEN NOT MATCHED clause.
Below, we use this to confirm that records with the same user_id and event_timestamp aren't already in the events table.
MERGE INTO events a
USING events_update b
ON a.user_id = b.user_id AND a.event_timestamp = b.event_timestamp
WHEN NOT MATCHED AND b.traffic_source = 'email' THEN
  INSERT *
Overwrite in Delta Lake
We can use overwrites to atomically replace all of the data in a table. There are multiple benefits to overwriting tables instead of deleting and recreating tables:
- Overwriting a table is much faster because it doesn’t need to list the directory recursively or delete any files.
- The old version of the table still exists; can easily retrieve the old data using Time Travel.
- It’s an atomic operation. Concurrent queries can still read the table while you are deleting the table.
- Due to ACID transaction guarantees, if overwriting the table fails, the table will be in its previous state.
Spark SQL provides two easy methods to accomplish complete overwrites.
- CREATE OR REPLACE TABLE (CRAS) statements fully replace the contents of a table each time they execute.
CREATE OR REPLACE TABLE events AS
SELECT * FROM parquet.`dbfs:/ecommerce/raw/events-historical`- INSERT OVERWRITE provides a nearly identical outcome as above: data in the target table will be replaced by data from the query.
- Can only overwrite an existing table, not create a new one like our CRAS statement
- Can overwrite only with new records that match the current table schema -- and thus can be a "safer" technique for overwriting an existing table without disrupting downstream consumers
- Can overwrite individual partitions
INSERT OVERWRITE sales
SELECT * FROM parquet.`dbfs:/ecommerce/raw/sales-historical/`
A primary difference here has to do with how Delta Lake enforces schema on write.
Whereas a CRAS statement will allow us to completely redefine the contents of our target table, INSERT OVERWRITE will fail if we try to change our schema (unless we provide optional settings).
Copy Into for Incremental Load
COPY INTO provides SQL engineers an idempotent option to incrementally ingest data from external systems.
Note that this operation does have some expectations:
- Data schema should be consistent
- Duplicate records should try to be excluded or handled downstream
- COPY INTO must target an existing Delta table.
- The source file must specify the file’s format.
This operation is potentially much cheaper than full table scans for data that grows predictably.
While here we'll show simple execution on a static directory, the real value is in multiple executions over time picking up new files in the source automatically.
COPY INTO sales
FROM "dbfs:/ecommerce/raw/sales-30m"
FILEFORMAT = PARQUET
Files in Delta Lake
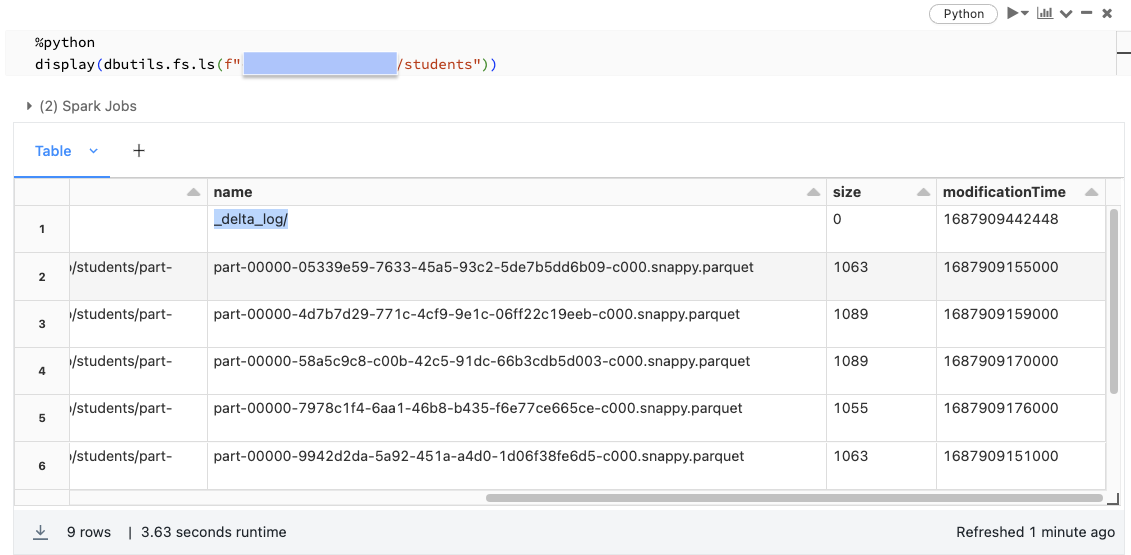
Using DESCRIBE EXTENDED allows us to see important metadata about our table. While we've so far been thinking about our table as just a relational entity within a schema, a Delta Lake table is actually backed by a collection of files stored in cloud object storage.
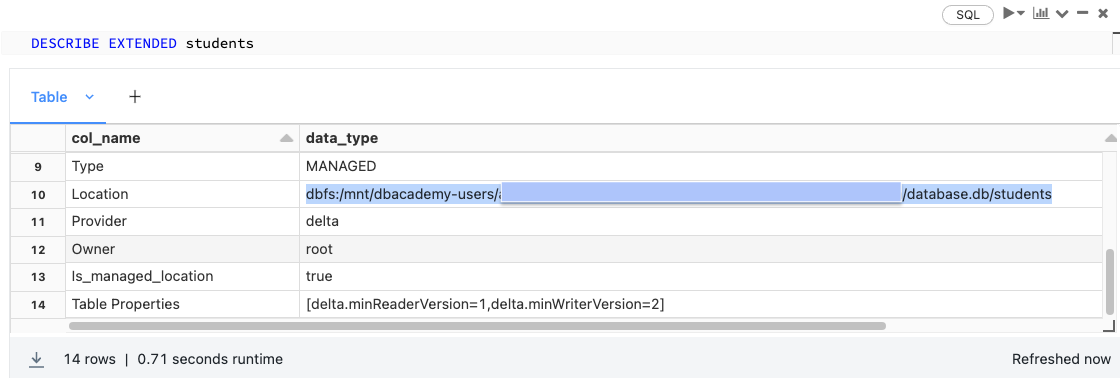
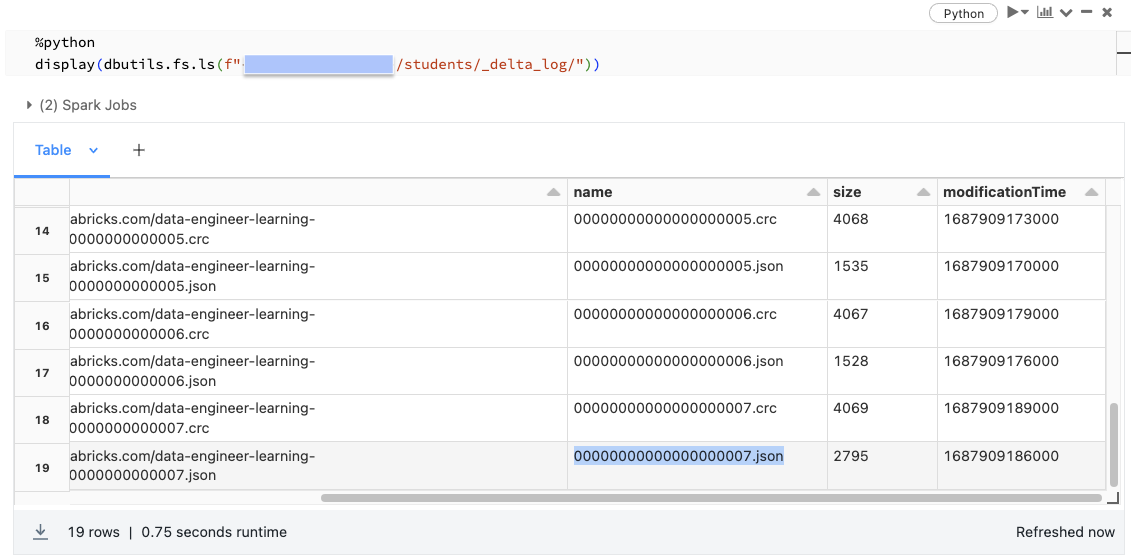
Note that our directory contains a number of Parquet data files and a directory named _delta_log.
- Records in Delta Lake tables are stored as data in Parquet files.
- Transactions to Delta Lake tables are recorded in the _delta_log.
- Each transaction results in a new JSON file being written to the Delta Lake transaction log. Here, we can see that there are 8 total transactions against this table (Delta Lake is 0 indexed).
Rather than overwriting or immediately deleting files containing changed data, Delta Lake uses the transaction log to indicate whether or not files are valid in a current version of the table.
Here, we'll look at the transaction log corresponding the MERGE statement above, where records were inserted, updated, and deleted.
%python
display(spark.sql(f"SELECT * FROM json.`dbfs:/students/_delta_log/00000000000000000007.json`"))
The add column contains a list of all the new files written to our table; the remove column indicates those files that no longer should be included in our table. These removed files provide us with the ability to query previous versions of our table.
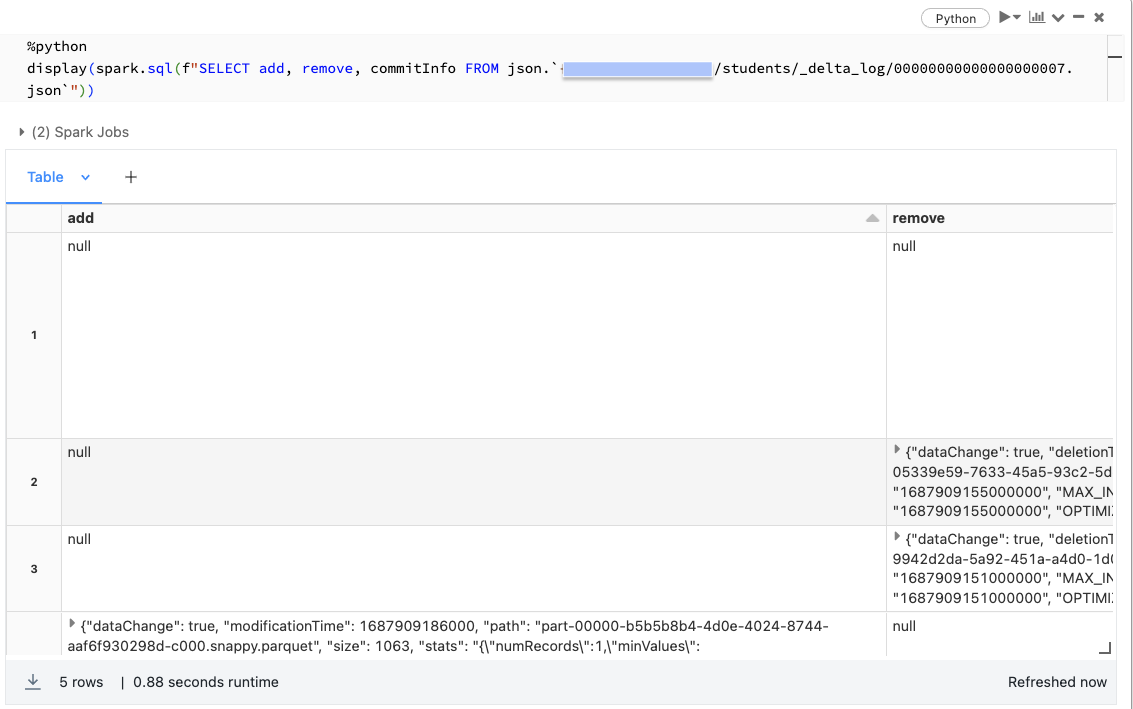
When we query a Delta Lake table, the query engine uses the transaction logs to resolve all the files that are valid in the current version, and ignores all other data files.
Time Travel in Delta Lake
Because all changes to the Delta Lake table are stored in the transaction log, we can easily review the table history
DESCRIBE HISTORY studentsThe operationsParameters column will let you review predicates used for updates, deletes, and merges. The operationMetrics column indicates how many rows and files are added in each operation.
DESCRIBE DETAIL allows us to see some other details about our Delta table, including the number of files. Here we see that our table currently contains 4 data files in its present version.
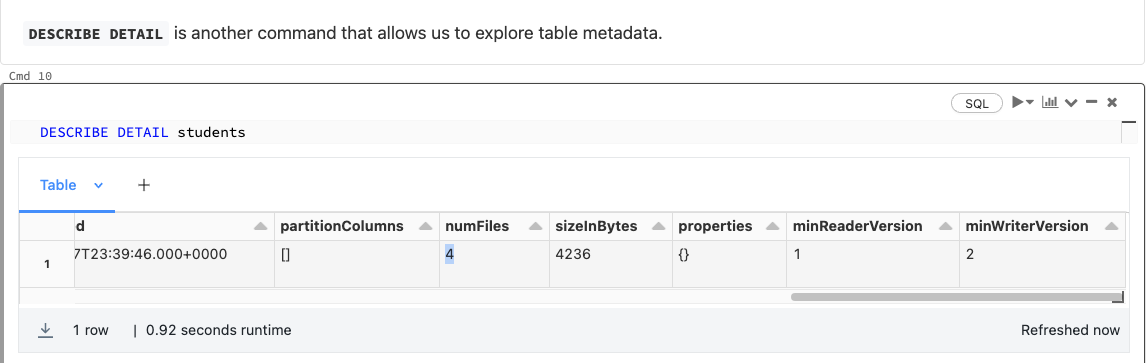
However, there are 8 files in the table’s delta path. These files are removed data from the current version to allow time travel
What's important to note about time travel is that we're not recreating a previous state of the table by undoing transactions against our current version; rather, we're just querying all those data files that were indicated as valid as of the specified version
These time travel queries can be performed by specifying either the integer version or a timestamp.
NOTE: In most cases, you'll use a timestamp to recreate data at a time of interest. You can also specify the version number
SELECT * FROM students VERSION AS OF 3
-- OR
select * from students@v3%python
# Load delta table with a particular version
delta_df = (spark.read
.format("delta")
.option("versionAsOf", 0)
.load('path/to/delta'))
# Load delta table with a particular timestamp
timestamp = spark.sql(f"DESCRIBE HISTORY delta.`{path/to/delta}`").orderBy("version").first().timestamp
delta_df = (spark.read
.format("delta")
.option("timestampAsOf", timestamp)
.load('path/to/delta'))In Delta, you can roll back a commit by RESTORE TABLE. Note that a RESTORE command is recorded as a transaction; you won't be able to completely hide the fact that you accidentally deleted all the records in the table, but you will be able to undo the operation and bring your table back to a desired state.
RESTORE TABLE students TO VERSION AS OF 8Vacuum in Delta Lake
Databricks will automatically clean up stale files in Delta Lake tables.
While Delta Lake versioning and time travel are great for querying recent versions and rolling back queries, keeping the data files for all versions of large production tables around indefinitely is very expensive (and can lead to compliance issues if PII is present).
If you wish to manually purge old data files, this can be performed with the VACUUM operation.
By default, VACUUM will prevent you from deleting files less than 7 days old, just to ensure that no long-running operations are still referencing any of the files to be deleted. If you run VACUUM on a Delta table, you lose the ability time travel back to a version older than the specified data retention period.
Specify retention of 0 HOURS will keep only the current version. It’s very dangerous to run vacuum of 0 hours as it can result in data loss when new files are added while vacuum is still running. As the result, Databricks have safeguard in place to prevent users from doing this. Before running this Vacuum of 0 hours, you have to do the followings:
- Turn off a check to prevent premature deletion of data files
- Make sure that logging of VACUUM commands is enabled
- Use the DRY RUN version of vacuum to print out all records to be deleted
%sql
SET spark.databricks.delta.retentionDurationCheck.enabled = false;
SET spark.databricks.delta.vacuum.logging.enabled = true;

VACUUM students RETAIN 0 HOURS DRY RUN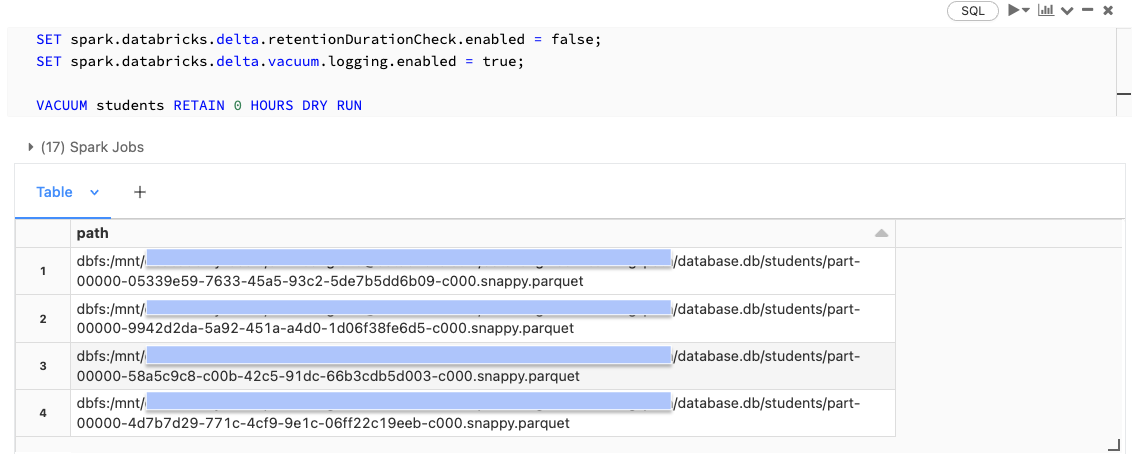
By running VACUUM and deleting the files above, we will permanently remove access to versions of the table that require these files to materialize. Because VACUUM can be such a destructive act for important datasets, it's always a good idea to turn the retention duration check back on after vacuuming.
-- You can run vacuum on the table or the delta storage path
VACUUM students RETAIN 0 HOURS
-- Or
VACUUM delta.`<delta-table-path>` RETAIN 0 HOURS

-- Reset retentionCheck
SET spark.databricks.delta.retentionDurationCheck.enabled = true;