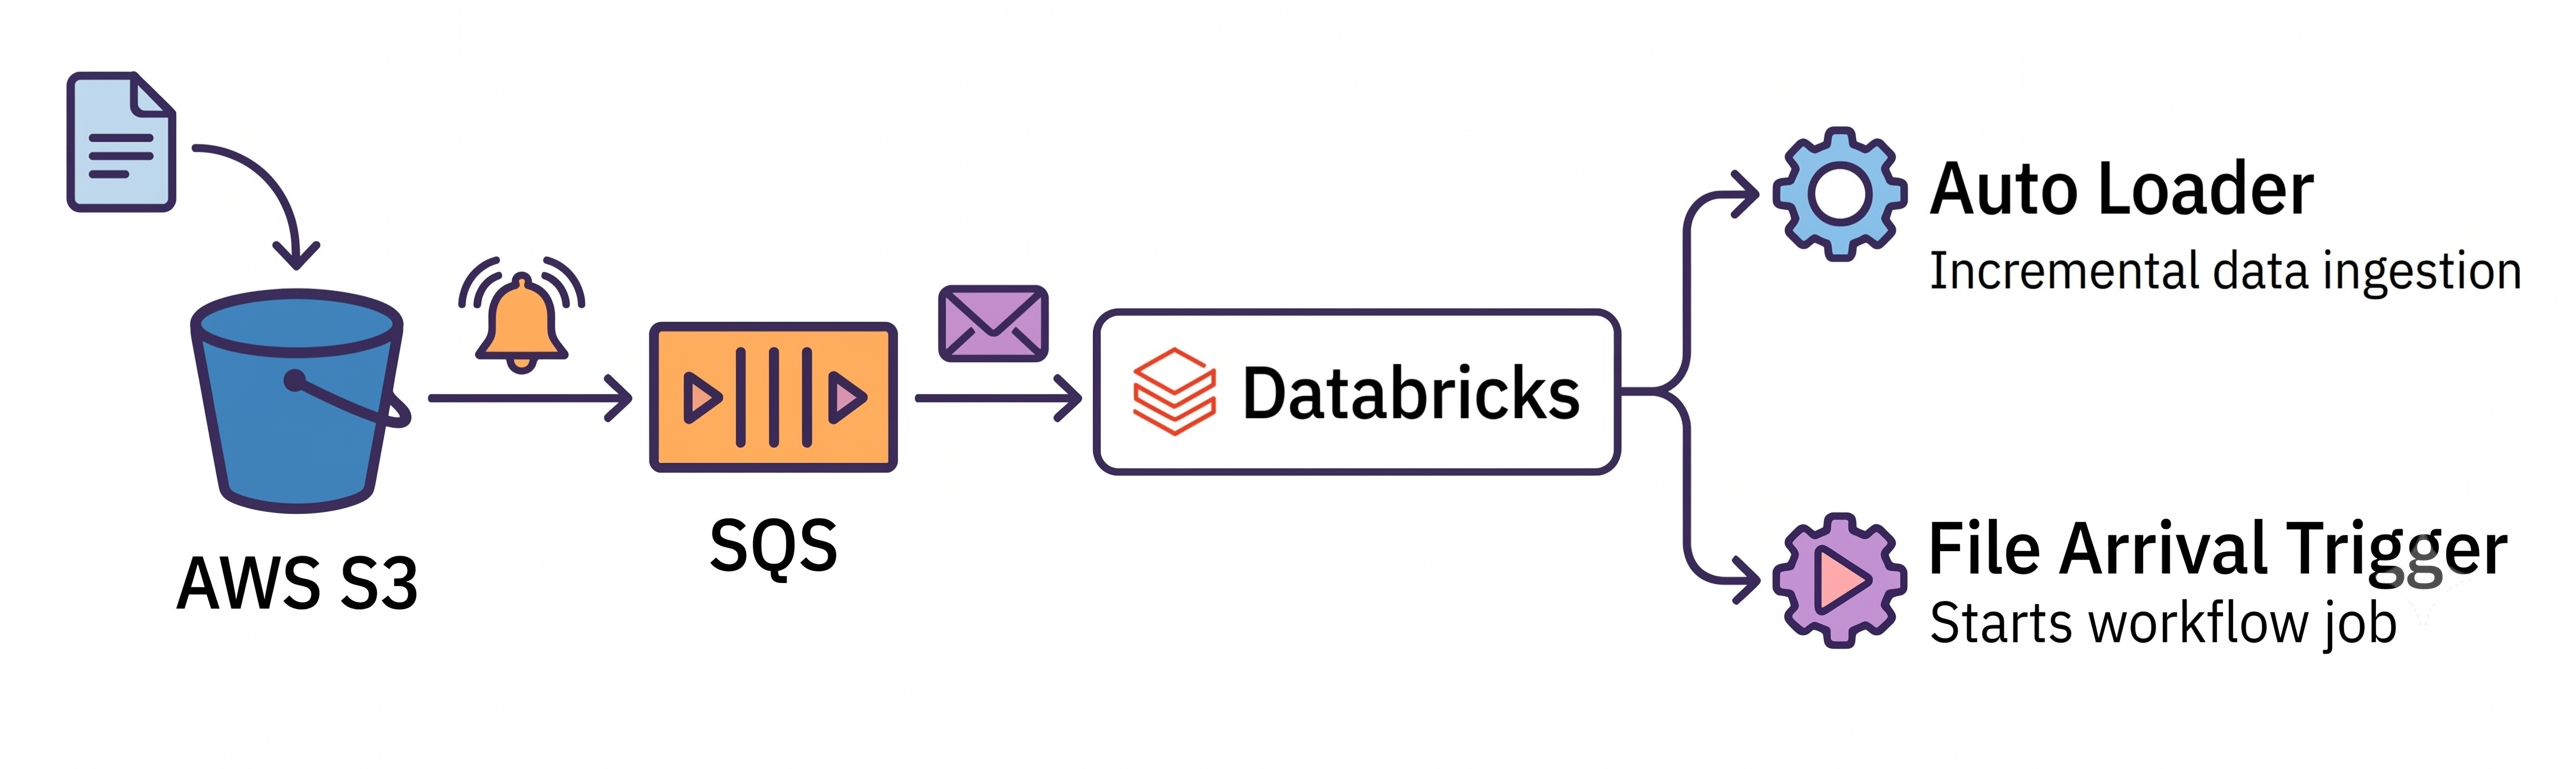
Databricks Managed File Events for Auto Loader and File Arrival Trigger (AWS S3 + Provided SQS)
This guide is an end-to-end, copy-pasteable runbook for setting up Databricks file events on AWS using:
- Your own SQS queue (Provided queue mode)
- Direct S3 → SQS notifications (no SNS)
- Unity Catalog external locations
- File arrival triggers for Databricks Jobs
- Auto Loader with managed file events to incrementally ingest the files
What is Auto Loader?
Auto Loader is Databricks' incremental ingestion engine for cloud object storage (S3, ADLS, GCS). As new files land in a storage path, Auto Loader discovers and processes only the files it hasn't seen before — no manual bookkeeping, no reprocessing of old data. It also handles schema inference and schema evolution as your incoming data changes over time.
The hard part of incremental ingestion is file discovery: how does Auto Loader know which files are new? It supports two strategies:
- Directory listing — list the storage path on every run and diff it against what's already been processed. Simple, but it gets slow and expensive as the number of files grows, because every run rescans the whole directory.
- File notifications — instead of listing, subscribe to cloud storage events (e.g. S3 → SQS) so the cloud tells Auto Loader when a file arrives. This scales to high file counts at low latency.
What are managed file events?
Historically, file-notification mode required each consumer to provision its own SNS topic + SQS queue + subscription per bucket. Multiple streams reading the same bucket meant multiple notification pipelines, which quickly bumped into AWS's per-bucket notification limits and left behind orphaned cloud resources when streams were deleted.
Managed file events solve this. You configure file events once on a Unity Catalog external location, and Databricks manages a shared notification pipeline for that bucket. Every Auto Loader stream and every file-arrival job that reads from the external location reuses the same pipeline. Concretely:
- Cloud storage publishes an event whenever a file is created, removed, or expires.
- A managed service consumes that queue and caches the file metadata.
- On its first run, Auto Loader does one full directory listing to set an initial checkpoint. Every run after that reads new files directly from the file-events cache using the stored read position — no more directory listings.
Why you should care
- Scales without hitting cloud limits — one shared pipeline per bucket instead of one per consumer, so you avoid AWS per-bucket notification caps and resource sprawl.
- Lower cost and latency at scale — no repeated full-directory scans; discovery cost stays roughly flat as your file count grows.
- Less cloud plumbing to manage — file events are configured on the external location and governed by Unity Catalog, instead of being wired up per stream. (In this guide we use Provided queue mode, where you bring your own SQS queue — useful when your org standardizes on its own queues and IAM policies.)
- Reusable across workloads — the same external location powers both Auto Loader streaming ingestion and file-arrival job triggers.
Latency note: managed file events add a small caching hop between cloud storage and Auto Loader. For the lowest-latency streaming use cases, classic file-notification mode (reading the cloud queue directly) can be marginally faster. For most ingestion workloads, the operational benefits outweigh that.
Keep streams alive: the cached read position expires after 7 days of inactivity. Run each Auto Loader stream at least once a week, or it falls back to a full directory rescan. Disabling/enabling file events or changing paths/queues also forces a rescan.
What is a file-arrival trigger?
A file-arrival trigger starts a Databricks Job automatically when new files appear in a storage location, instead of running the job on a fixed schedule. This gives you event-driven processing with better resource utilization — the cluster only spins up when there's actually new data to handle. It reads from the same Unity Catalog external location, so once file events are configured you get both incremental Auto Loader ingestion and event-driven job orchestration from a single setup. For near-continuous workloads, set the minimum time between triggers to 1 minute or higher to keep polling overhead down.
Step 0 — Prerequisites
- AWS account + IAM permissions
- Databricks workspace with Unity Catalog enabled
- Bucket and queue in the same region
- Standard SQS queue (NOT FIFO)
Step 1 — Create / identify IAM role for Databricks
Create an IAM role (example: databricks-role). This is the role Databricks will assume.
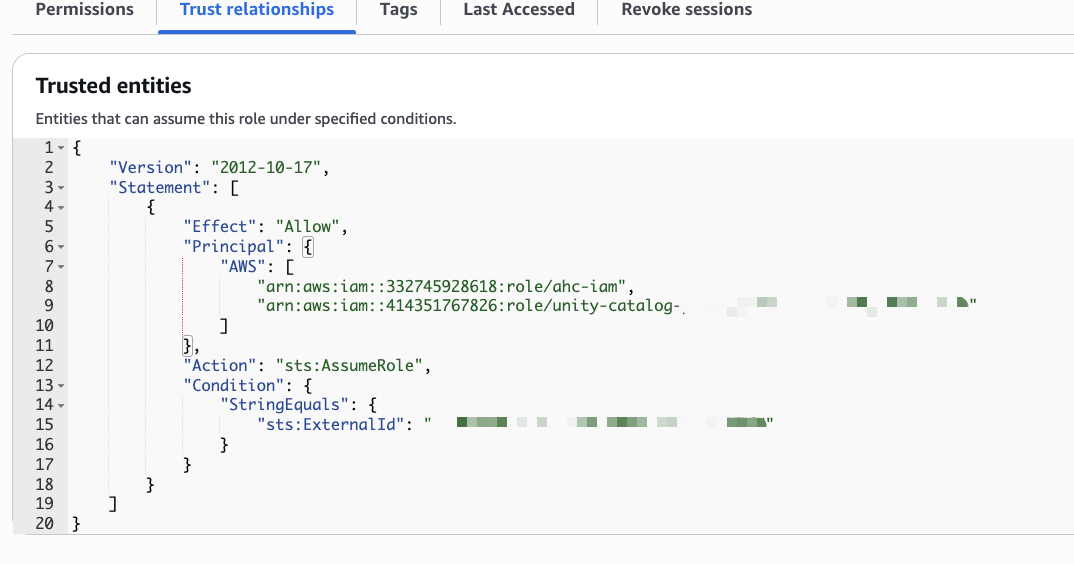
Trust policy (Databricks assumes this role)
{
"Version": "2012-10-17",
"Statement": [
{
"Effect": "Allow",
"Principal": {
"AWS": "arn:aws:iam::<DATABRICKS_ACCOUNT_ID>:root"
},
"Action": "sts:AssumeRole",
"Condition": {
"StringEquals": {
"sts:ExternalId": "<DATABRICKS_EXTERNAL_ID>"
}
}
}
]
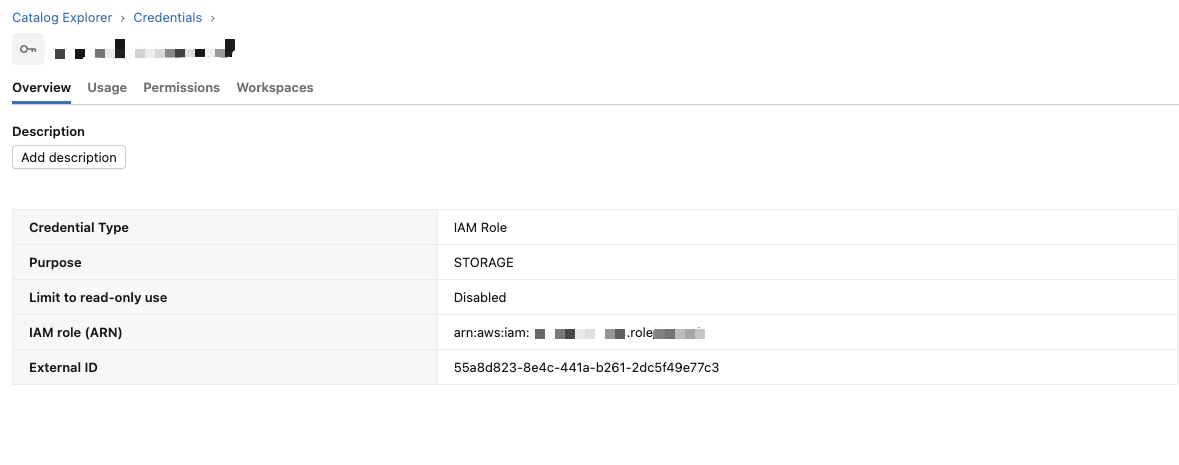
}Databricks provides the Account ID and External ID in the Storage Credential UI.
Step 2 — Create the SQS queue
Create a Standard queue:
- Name:
my-queue - Region: same as bucket
SQS queue access policy (allows S3 → SQS)
Attach this queue policy:
{
  "Version": "2012-10-17",
  "Statement": [
    {
      "Sid": "AllowS3SendMessageFromBucket",
      "Effect": "Allow",
      "Principal": {
        "Service": "s3.amazonaws.com"
      },
      "Action": "SQS:SendMessage",
      "Resource": "arn:aws:sqs:us-west-2:<AWS_ACCOUNT_ID>:my-queue",
      "Condition": {
        "StringEquals": {
          "aws:SourceAccount": "<AWS_ACCOUNT_ID>"
        },
        "ArnEquals": {
          "aws:SourceArn": "arn:aws:s3:::my-bucket"
        }
      }
    }
  ]
}
This allows only your bucket to publish events.
Reference: Configure a bucket for notifications
Step 3 — IAM policy: S3 access + bucket notification READ
Attach this policy to the role (databricks-role).
{
  "Version": "2012-10-17",
  "Statement": [
    {
      "Sid": "S3ObjectAccess",
      "Effect": "Allow",
      "Action": [
        "s3:GetObject",
        "s3:PutObject",
        "s3:DeleteObject",
        "s3:ListBucket",
        "s3:GetBucketLocation",
        "s3:GetBucketNotification",
        "s3:ListBucketMultipartUploads",
        "s3:ListMultipartUploadParts",
        "s3:AbortMultipartUpload"
      ],
      "Resource": [
        "arn:aws:s3:::my-bucket",
        "arn:aws:s3:::my-bucket/*"
      ]
    }
  ]
}
Why s3:GetBucketNotification is required: Databricks validates file events by calling GetBucketNotificationConfiguration. Without this, File Events Read fails.
Step 4 — IAM policy: SQS consume (Provided queue)
Attach this policy to the same role (databricks-role).
{
  "Version": "2012-10-17",
  "Statement": [
    {
      "Sid": "QueuePermission",
      "Effect": "Allow",
      "Action": [
        "sqs:DeleteMessage",
        "sqs:ReceiveMessage",
        "sqs:SendMessage",
        "sqs:PurgeQueue"
      ],
      "Resource": "arn:aws:sqs:us-west-2:<AWS_ACCOUNT_ID>:my-queue"
    }
  ]
}
Step 5 — Configure S3 event notifications
Via AWS Console
S3 → Bucket → Properties → Event notifications → Create
- Destination: SQS queue
- Queue:
my-queue - Events:
- ✔ All object create events (
s3:ObjectCreated:*) - ✔ All object removal events (
s3:ObjectRemoved:*) - ✔ Lifecycle expiration events (
s3:LifecycleExpiration:*)
- ✔ All object create events (

Equivalent CLI
aws s3api put-bucket-notification-configuration \
  --bucket my-bucket \
  --notification-configuration '{
    "QueueConfigurations": [
      {
        "Id": "databricks-file-events",
        "QueueArn": "arn:aws:sqs:us-west-2:<AWS_ACCOUNT_ID>:my-queue",
        "Events": [
          "s3:ObjectCreated:*",
          "s3:ObjectRemoved:*",
          "s3:LifecycleExpiration:*"
        ],
        "Filter": {
          "Key": {
            "FilterRules": [
              { "Name": "prefix", "Value": "incoming/" }
            ]
          }
        }
      }
    ]
  }'
Reference: Enabling event notifications
Step 6 — Create Storage Credential in Databricks
Databricks UI:
- Catalog → Storage Credentials → Create
- Type: IAM role
- Role ARN:
arn:aws:iam::<AWS_ACCOUNT_ID>:role/databricks-role
❗️IMPORTANT: Update the Trust relationship policy of the IAM role created in Step 1 with the Storage Credential's External ID.
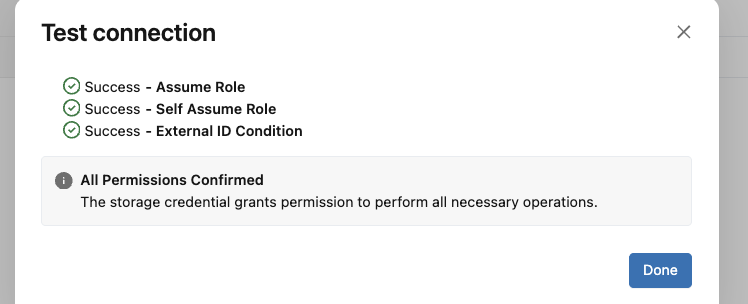
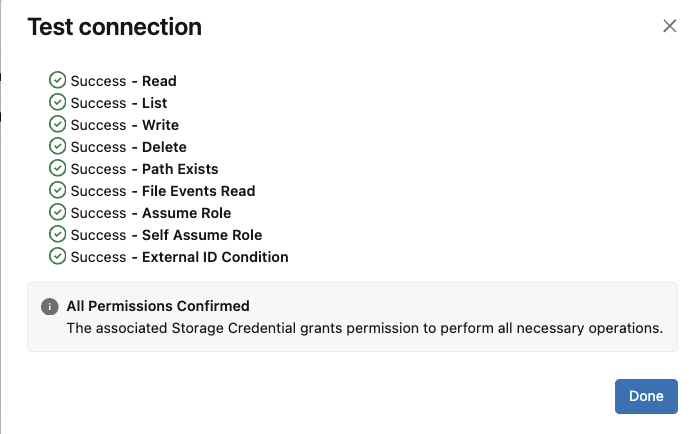
Validate successfully. All checks should pass.
Step 7 — Create External Location
Databricks UI:
- Catalog → External Locations → Create
- URL:
s3://my-bucket/ - Storage credential: created above
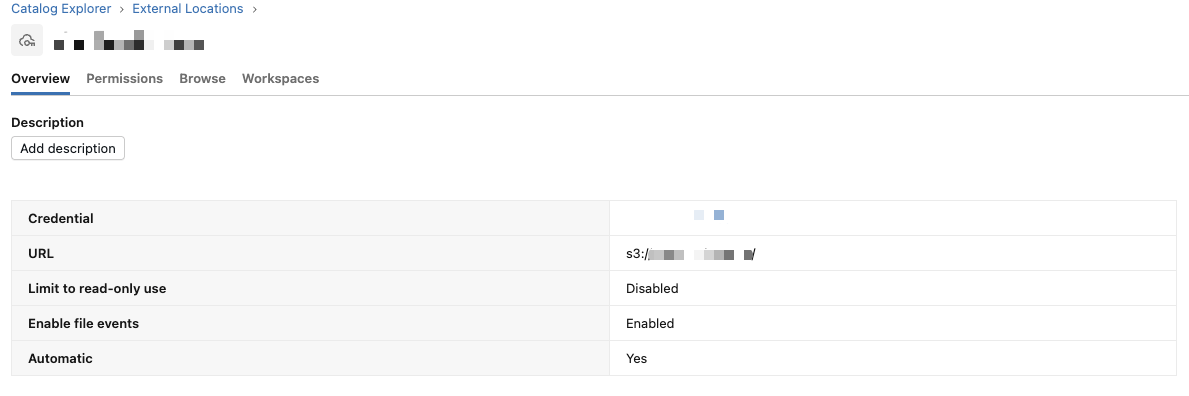
Enable file events (Advanced)
- File events: Enabled
- Queue type: Provided
- Queue URL:
https://sqs.us-west-2.amazonaws.com/<AWS_ACCOUNT_ID>/my-queue
Test connection: all checks should pass, including File Events Read.
Reference: Manage external locations — file events
Step 8 — Create notebook with Auto Loader code
Below code uses Auto Loader to ingest csv files uploaded to cloud storage location (S3 bucket) then write to Delta table orders_raw in Unity Catalog
df = (spark.readStream
.format("cloudFiles")
.option("cloudFiles.format", "csv")
.option("header", "true")
.option("cloudFiles.schemaLocation", "dbfs:/tmp/schema/orders_autoloader")
.option("cloudFiles.inferColumnTypes", "true")
.option("cloudFiles.schemaEvolutionMode", "addNewColumns")
.option("cloudFiles.useManagedFileEvents", "true")
.load("s3://my-bucket/incoming/")
)
(df.writeStream
.format("delta")
.option("checkpointLocation", "dbfs:/tmp/chk/orders_autoloader")
.option("mergeSchema", "true")
.trigger(availableNow=True)
.table("orders_raw")
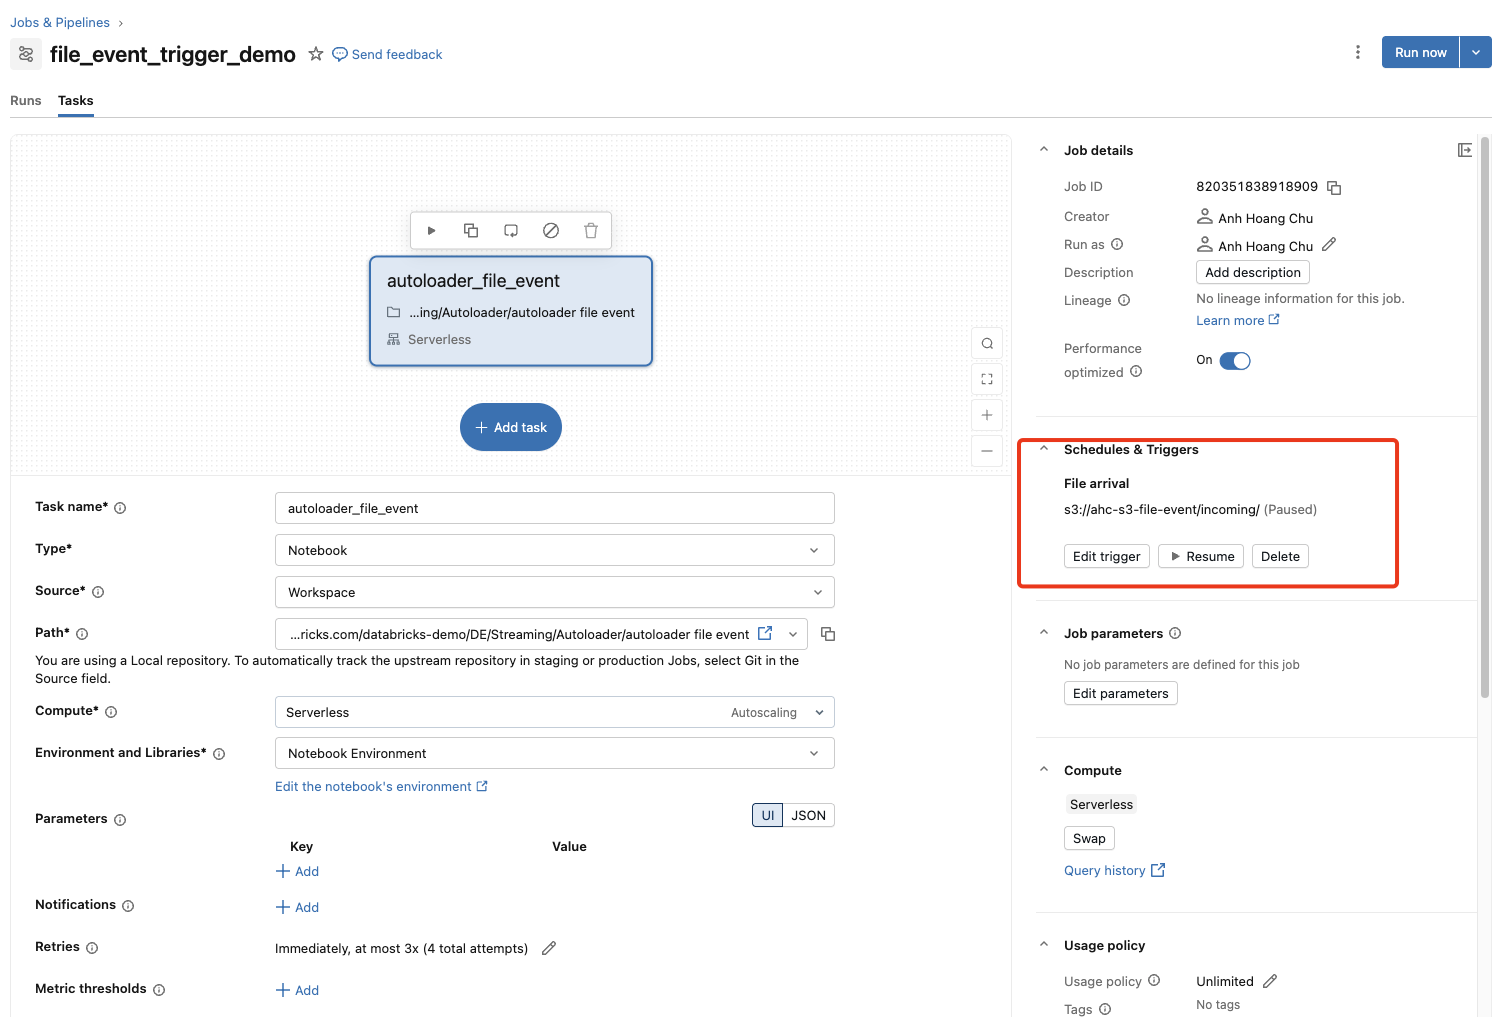
)Step 9 — Create Job with File Arrival Trigger
Databricks UI:
- Workflows → Jobs → Create job
- Add task: add the notebook specified in Step 8 to the task
Trigger
- Trigger type: File arrival
- Storage location:
s3://my-bucket/incoming/
Advanced (recommended)
- Minimum time between triggers: 5 min
- Wait after last change: 1 min
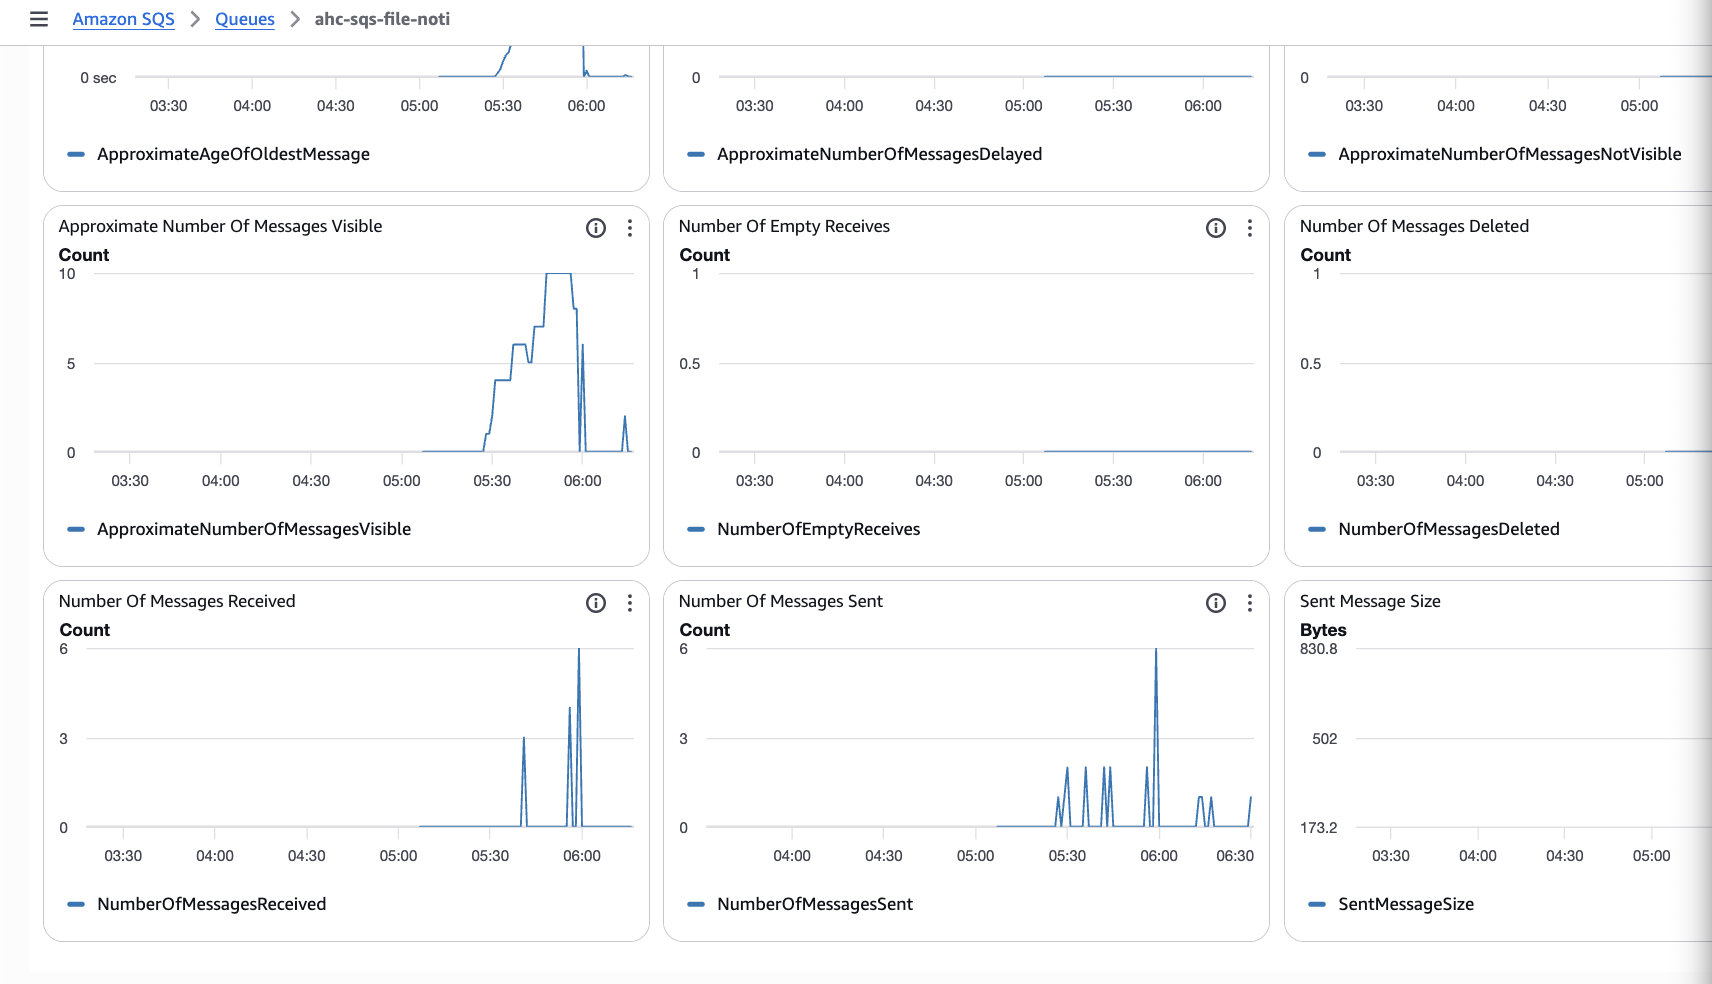
Step 10 — Validation checklist
- Upload file to
incoming/ - SQS → Monitoring → Messages sent increases
- Job triggers
- Auto Loader ingests file once (no duplicates)
The Monitoring tab of the provided queue should show messages received:
Common failure causes
| Symptom | Cause |
|---|---|
| File Events Read Failed | Missing s3:GetBucketNotification |
| Queue empty | SQS policy missing S3 principal |
| Job triggers repeatedly | No debounce settings |
| Schema mismatch | Missing schema evolution |